How to add an activity or event
There are several approaches on how to add a new activity, event or to-do:
- directly from Calendar View (recommended) - the order is the same for Day, Week or Month view and is described below – the advantage of this approach is that start date and time are automatically defined by your selection and you can easily see whether the time slot is empty for your activity as well as invited colleagues
- using Add event button
- using action buttons [Add Event], [Add To Do] from records of the modules like Contacts, Organizations
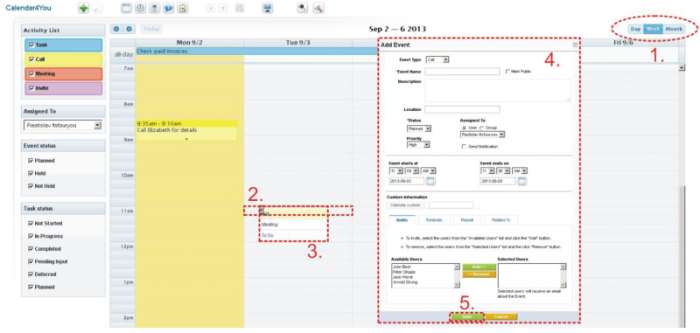
The recommended and quick approach is using Calendar View. It allows creating activities directly from the Day, Week or Month view for any particular time. In order to add new activity:
- Switch to Day, Week or Month view according to your needs.
- Click on the Calendar View to select start time of your activity.
- Select activity type (Call, Meeting, etc).
- The new window "Add Event" (for Call, Meeting, etc.) or "Create To Do" (for tasks) will appear on the screen.
- Fill in the form fields and save it using the [Save] button.
Calendar View
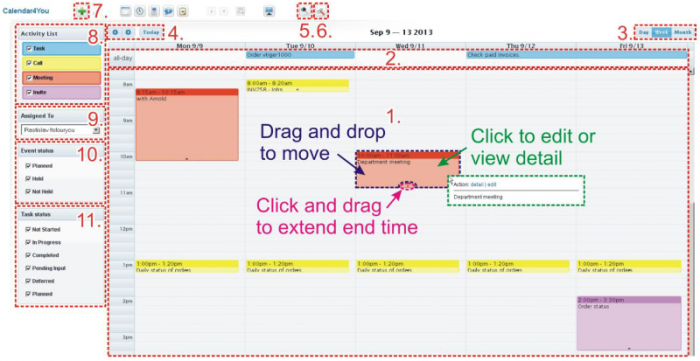
The Calendar View has several possibilities to be adjusted according to your needs and provides new functionalities. The following two pictures present some of CalendarView functions:
- Calls, meetings, invites and other activities are represented by rectangular areas which cover places with respect to real start/end time of the activities. You can easily drag and drop activities, simply extend end time or easily to switch to Edit View or Detail View of the activities.
- Tasks/To Dos are shown in the Calendar View as well, at the top part "all-day" section.
- Day, Week and Month calendar are provided. Just click on the buttons to change the view.
- Quick navigation buttons can be used to select a date.
- User Settings – deals with Time settings, Calendar sharing and Google authentication.
- Module manager settings – profile privileges.
- Add new activity button (It opens a new window to create new activity for current day).
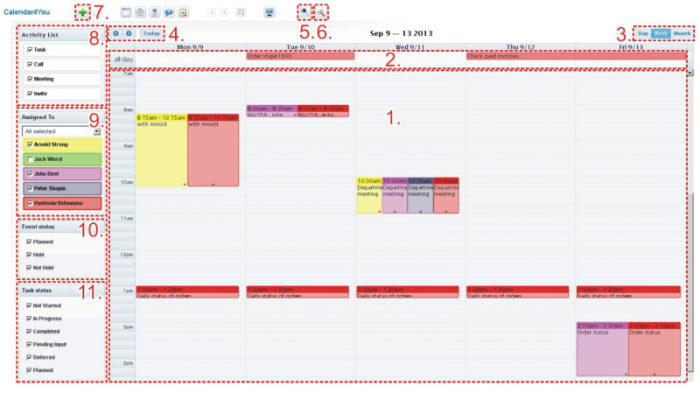
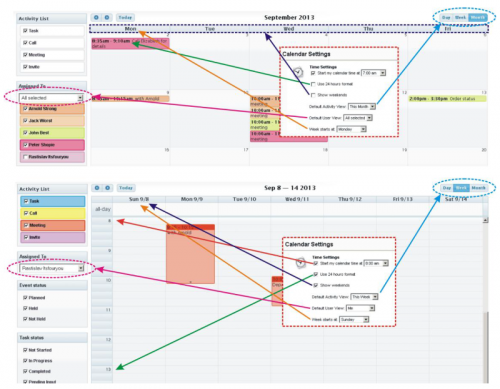
- Within Activity List panel you can easily show/hide different types of activities. In addition you can define colors, displayed information and set up Google synchronization. As you can see in the next image, the activities are shown in colors in case you are viewing only activities assigned to one user.
- The panel "Assigned To" is used to show/hide activities for more users on the calendar or just to see other user activities. In this case the colors are used to easily distinguish activities of the corresponding user.
- Using checkboxes you can easily select users of the group of interest. Another advantage is that the selected group is remembered under "All selected" value and can be used again when you access the system again.
- Using checkboxes of the panel "Event status" you can show/hide events based on their status.
- Using checkboxes of the panel "Task status" you can show/hide tasks based on their status.
Calendar Settings
The Calendar settings consist of:
- Calendar View settings – available for all users via Activity list panel
- User Settings – user specific settings
- Module manager settings: special profiles
Calendar View settings
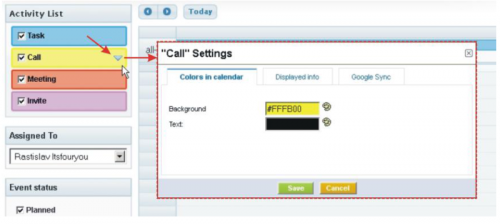
There are some additional settings related to Calendar View which can be initiated directly from Activity list panel as shown in the picture below. The Calendar View settings consist of the following tabs:
- Colors in Calendar
- Displayed Information (not available for Invite)
- Google Synchronization (not available for Task and Invite)
Colors in calendar
On the Calendar View we can use different colors. The intention is to provide a better overview by using different colors for single activity types or users depending on the current view. In addition you can select your own color for a single activity/user.
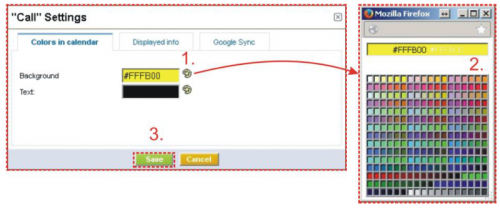
In order to select the color, initiate the Calendar View settings and follow these simple steps:
- Go to "Colors in calendar" tab and click on the icon.
- Select the color.
- Save the settings using the [Save] button.
Displayed information
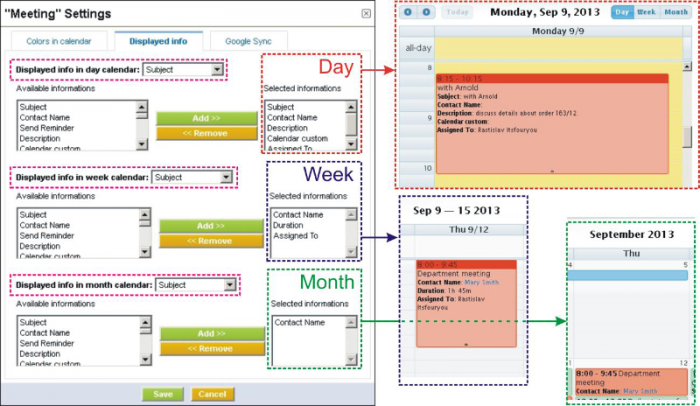
The "Displayed information" tab allows you to define how much information is displayed in Calendar View for all single views separately, i.e. for day calendar, week calendar as well as month calendar. In addition you can define displayed information separately for each activity type.
The use of this tab is simple. In order to view the more information fields available, select them from "Available informations" and click on the [Add >>] button. You can see the default field which will be used on the top of the selected fields (marked purple in the following picture).
Google Synchronization
User settings
This part contains:
- Time Settings – allows to define several views of the calendar from a time point of view
- Calendar sharing – deals with sharing of the calendar
- Google account settings – allows to add Google account
Time Settings
The definition of several time view calendar settings are described in the following table. Please refer also to image below to see examples of the usage.
| Name | Description |
|---|---|
| Start my calendar time at | Define your calendar start time. This setting is available for day and week calendar. |
| Use 24 hours format | Switch between 12 and 24 hours format. |
| Show weekends | Show/hide weekends. |
| Default Activity View | Define your calendar default activity view – day, week or month. |
| Default User View | Define your calendar default user view – Me (your activities only), All selected. |
| Week starts at | Define start day of the week – Monday, Sunday |
Calendar sharing
For the Calendar sharing, you just need to select from the available users.

Google account settings
Documents assigned to activities
The new Calendar also provides the possibility to assign documents to events or tasks. It means that meeting presentations or other discussed documents related to the calendar activity can be found in the "More Information" tab of the Detail View on the activity.
Google Integration
Frequently Asked Question
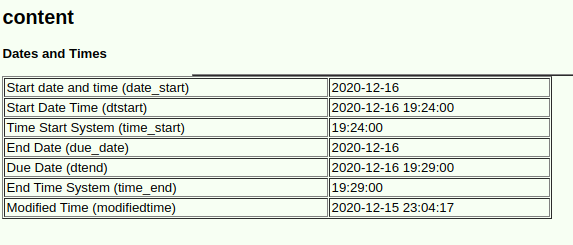
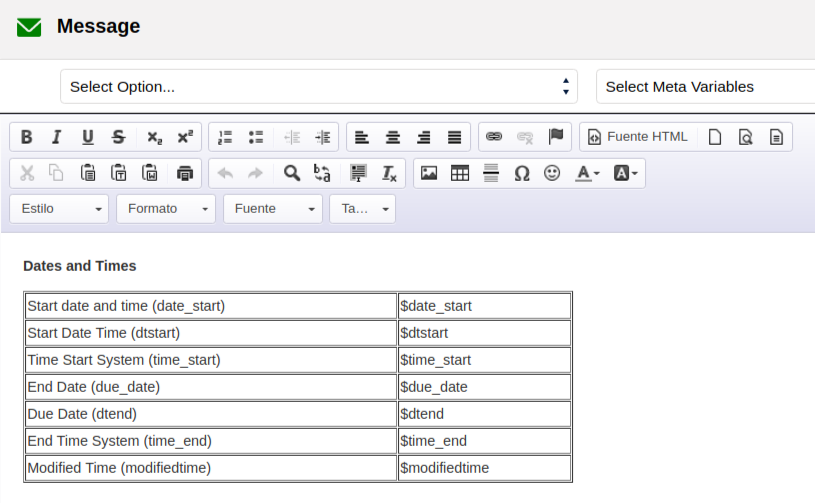
Hour is not the same in the calendar and email. Using a workflow that sends an email to the contact, with meeting time and date (variable existing in the event), there is a one hour difference between email received and event in agenda.
The email is sent in the timezone of the assigned user. Look at this example
This is the workflow email:
The coreBOS install I am testing on is set to UTC in config.inc.php. I create a calendar to-do with a user in the UTC timezone with the start date at 2020-12-16 22:24 to 2020-12-16 22:29. With the record assigned to this same user (UTC) I see this email:
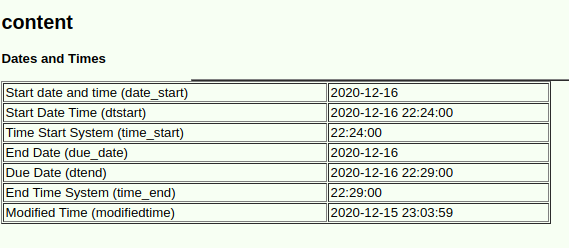
SWith a user in UTC+1 I get this one:
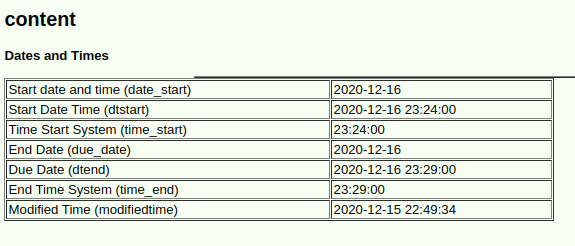
and with a user in UTC-3 I get: