Scheduled Workflows are time based, not event based, so they are triggered on a certain date/time. That totally defines and limits the way they work and the way they must be constructed, which is slightly different than the save event based workflows.
Scheduled Workflows enable you to run periodic tasks to automate your business. You can program the tasks to be executed when a certain time arrives so you can dedicate your attention to other business operations.
Scheduled Workflow Launch Times
The Scheduled Workflow feature offers you a wide variety of launch times to run your workflow. These options are:
- Hourly: Workflow is executed every hour
- Daily: Workflow is executed every day at the specified time
- Weekly: Workflow is executed on the selected days of every week
- On Specific Date: Workflow is executed on the selected date
- Monthly by Date: Workflow is executed on the selected days of every month
- Yearly: Workflow is executed on the selected day of every year
Scheduled Workflow Conditions Restrictions
Scheduled Workflows are different than event based workflows and their conditions also have a set of restrictions that the other workflows do not have. Most restrictions stem from the fact that we do not have a unique record to execute expressions against. So we cannot use formulas like
because there are no field values to concatenate.
To be honest, this type of expression could be supported, but it would need a big rewrite of the query engine so that the application could convert that into a valid SQL statement and do the concatenation in the database. Currently, the application's expression engine expects to have a valid active record that is being saved, so it can concatenate or, in general, operate with the field values of that record. Since Scheduled Workflows do not have one record to send into the formulas, these cannot be used.
Scheduled Workflows work by constructing an SQL statement that asks the database for records that fulfill the conditions. It gets back a whole set of records, not just one.
Another restriction that stems from this is the use of related entity fields. It is difficult to access fields on related entities in the SQL command that is being constructed, so accessing the fields of an Account from a contact requires some coding that we currently do not have in place.
Finally some operators have no meaning in scheduled workflows, mostly the "has changed" type operators which require a specific action of saving to detect the change between the "before" and "after" values. With scheduled workflows there is no "before" value, we are directly selecting records from the database and they have had no change whatsoever.
Scheduled Workflow Conditions
As with all other workflow types, you can set conditions on any field type as long as:
- the field belongs to the entity the workflow is related with
- you use static/rawtext values
You cannot currently use fields from other modules nor use formulas of any type.
To overcome the above restrictions, date fields have some special operators and some special functionality that will permit us to select records based on time which is what this type of workflows is all about.
For date fields we can choose from the next set of operators:
- Is/Is not
- Between
- Before/After
For these operators we can:
- set a fixed value
- use one of the functions:
- add_days(x): adds x days to today, where today is the day of execution
- sub_days(x): subtracts x days from today, where today is the day of execution
- Days ago: accepts a number and will subtract that number of days from today
- Days later: accepts a number and will add that number of days to today
- today
- tomorrow
- yesterday
Then we have a set of special operators which will take a number of hours or days and calculate a range of dates for the record selection. These are:
-
Less than hours before
-
Less than hours later
-
More than hours before
-
More than hours later
-
Less than days ago
-
Less than days later
-
More than days ago
-
More than days later
These divide time into four ranges and permits us to set our target date/time in any one of them. The next image depicts the four ranges and you can get a better understanding looking at the examples below.
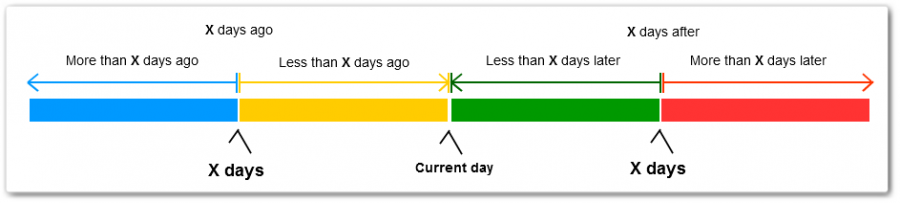
- less than days ago = yellow, less than X days ago
- more than days ago = blue, more than X days ago
- in less than = green, Less than X days later
- in more than = red, More than X days later
- days ago = yellow+blue, X days ago
- days later = green+red, X days after
Scheduled Workflow Conditions Examples
Look at the next examples of Scheduled Workflow condition configuration along with the associated SQL obtained using the evalwf.php script.
For the examples below, the workflow itself does not change, only the operators and values of the two fields in the conditions. One field is a date field and the other a time field.
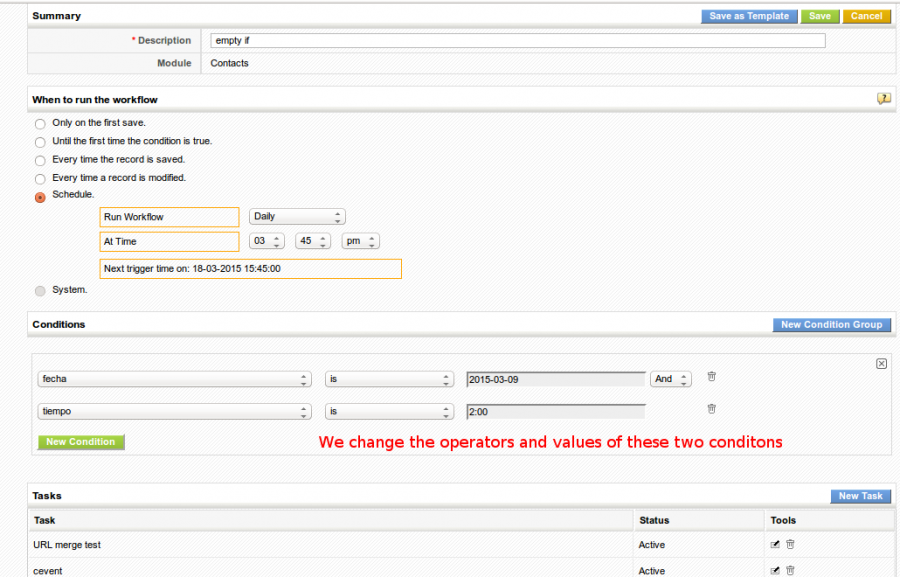
fecha is 2015-03-09 and tiempo is 2:00
fecha is not 2015-03-09 and tiempo is not 2:00
fecha before 2015-03-09
fecha less than 2 days ago and tiempo less than 2 hours before
fecha more than 2 days ago and tiempo more than 2 hours before
fecha in less than 2 days and tiempo less than 2 hours later
fecha in more than 2 days and tiempo more than 2 hours later
Escalate a case if it is opened for more than 4 hours
In this example, we will configure a workflow to escalate a case, if it’s not responded for more than four hours. You can have the workflow either escalate the case to the support manager, or trigger an email alert, or do both. This workflow is executed once in every hour.
- Hover over icon and click CRM Settings
- Click Workflows
- In the ‘Creating Workflow’ page, under the ‘Module’ tab, Select Projects from the Target Module dropdown
- Provide description for future reference
- Under ‘When to run the workflow’ options, select the Schedule radio-button and select Hourly from the ‘Run Workflow’ dropdown
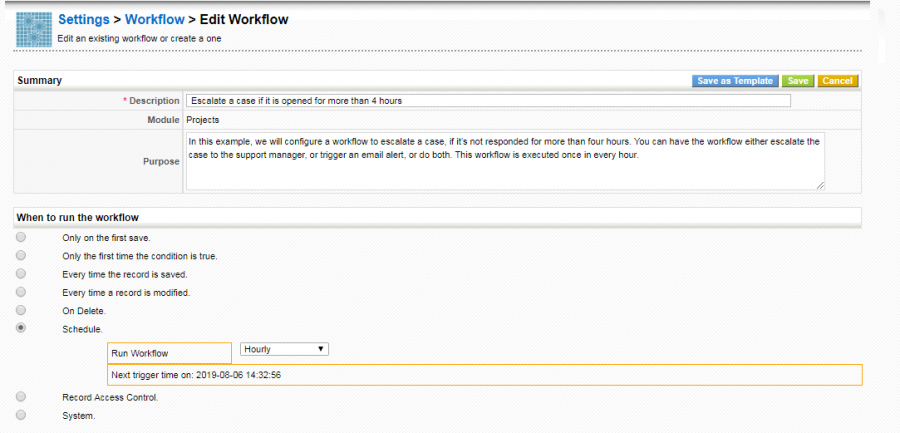
- Under the ‘Conditions’ tab, provide the filter conditions.Two conditions need to be configured: Status is initiated, and Created Time more than 4 hours before.

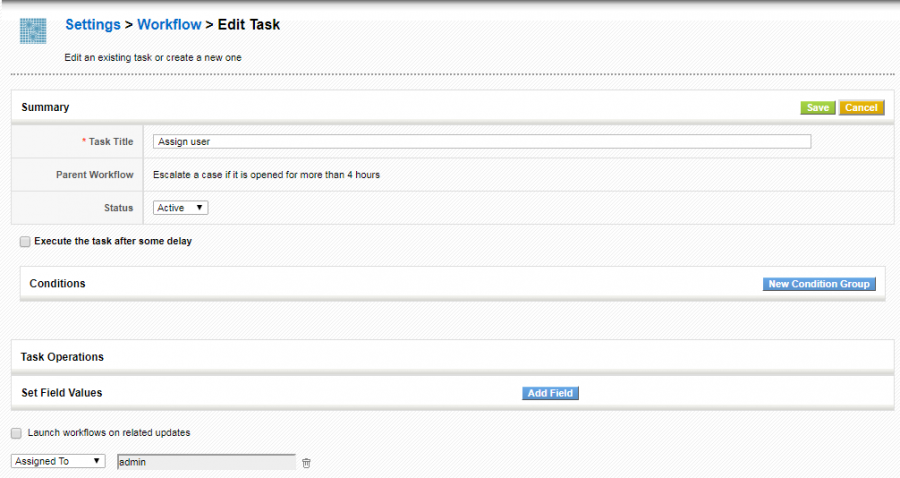
- After configuring the conditions, finally, you need to escalate the case to the Support Manager. To escalate, under the ‘Tasks’ Click New Task drop down tab and Click Update Fields.
- Fill Action Title field.
- Click Add Field Tab. Two new fields are displayed. From the first field, select Assigned to. From the second drop-down field, select desired user to whom the case should be assigned.
- Once you’re done, click Save.
Send an email to the customer, 2 days before the invoice due date, if the invoice hasn’t been paid until that date
Scheduled workflows help you to streamline your follow-up process by sending them regular email alerts to get paid punctually. We are going to create a scheduled workflow that automatically triggers an email 2 days before the invoice due date, if the invoice hasn’t been paid until that date. You can have this workflow send an email alert to the sales manager, or customer, or even both. This workflow is executed once in a day on the specified time.
- Click icon and click CRM Settings.
- Click Workflows
- In the ‘Creating Workflow’ page, under the ‘Module’ tab, Select Invoice from the Target Module dropdown
- Provide description for future reference
- Under ‘When to run the workflow’ options, select the Schedule radio-button, and select Daily from the ‘Run Workflow’ dropdown
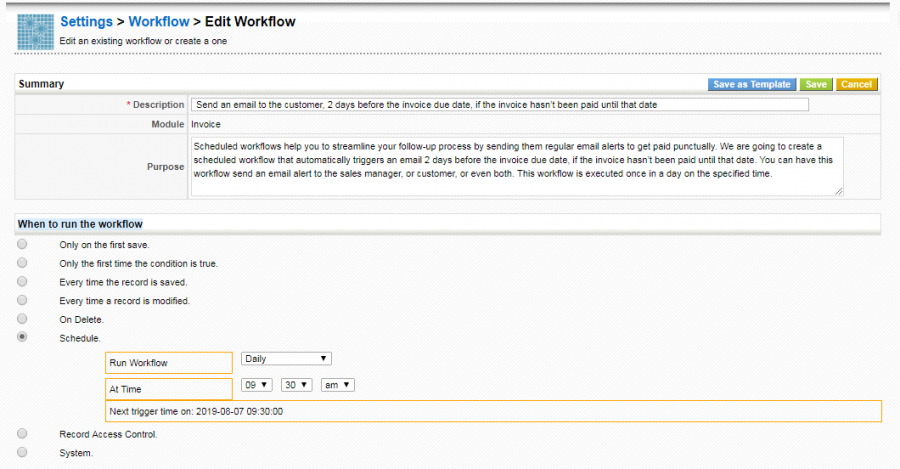
- Under the ‘Conditions’ tab, provide the filter conditions. Two conditions need to be configured: Due Date is 2 days later, and Status is not Paid.

- After configuring the conditions, you need to send email alerts to your Customer and Sales Manager. To compose an email alert, under the ‘Tasks’ Click New Task and Click Send Mail.
- Provide Task Title — Just for your reference.
- In the To field, select email recipients. Provide the catchy subject and compose your email body.
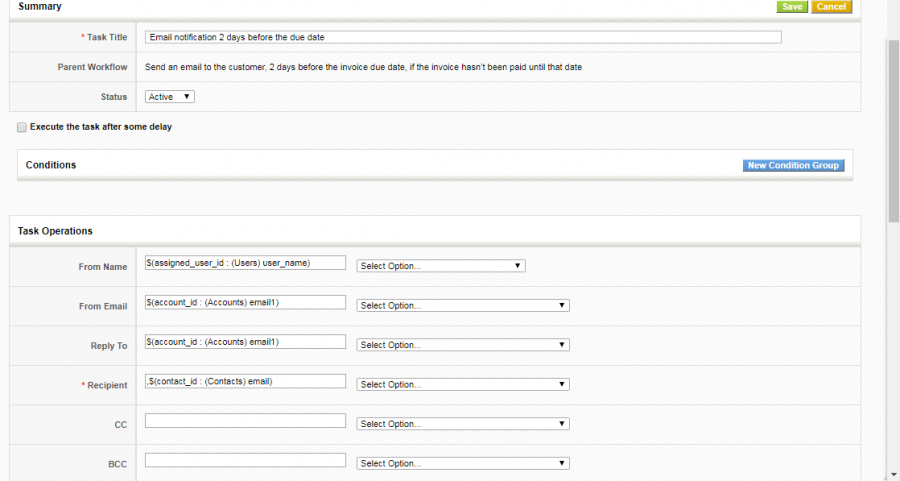
- Once you’re done, click Save.
Set automatic follow-ups with the Contacts before an Opportunity is closed
In this example, we will configure a workflow to send an email to Assigned to user when the Opportunity is about to Closed Won. This workflow is executed daily.
- Click icon and click CRM Settings.
- Click Workflows
- In the ‘Creating Workflow’ page, under the ‘Module’ tab, Select Opportunities from the Target Module dropdown
- Provide description for future reference
- Under ‘When to run the workflow’ options, select the Time Interval radio-button, and select Daily from the ‘Run Workflow’ dropdown
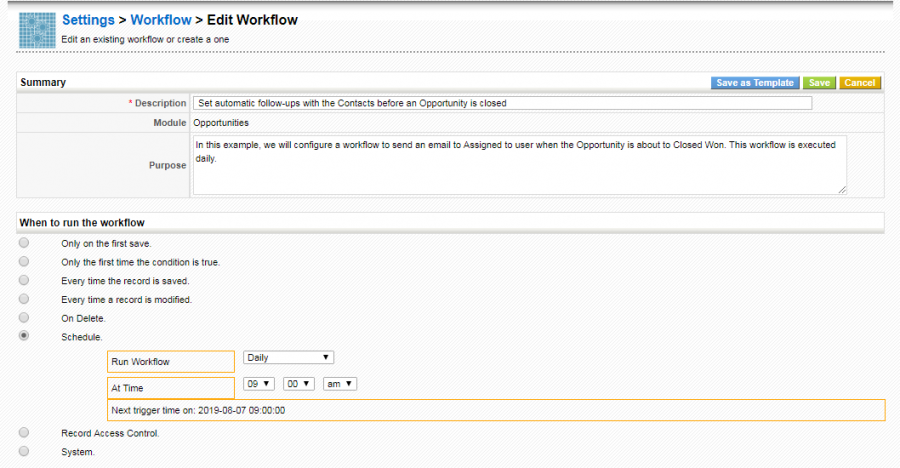
- Under the ‘Conditions’ tab, provide the filter conditions. Two conditions need to be configured: Expected Close Date in more than 10 days, and Sales Stage is not Closed Won.

- After configuring the conditions, you need to send email alerts to "Assigned To" user to follow up with the Client. To compose an email notification, under the ‘Tasks’ Click New Task and then Click Send Mail.
- Provide Task Title — Just for your reference. In the To field, select "Assigned To’ user’s email address. Provide catchy subject and compose your email body.

- Once you’re done, click Save.
Next | Chapter 4: Update Workflow Tasks.