coreBOS can use SendGrid to send emails.
coreBOS has an abstraction layer for sending emails, which you can read about here. Using this layer we have implemented a driver to send all emails in the system through SendGrid.
In my opinion, the biggest advantage is the direct feedback SendGrid gives us. I mean, besides the control and information that SendGrid gives you about each email going out of the application, which is incredible and totally invaluable (just have a look at the dashboard), even more important is the fact that we will get live information of what is happening with each email directly inside coreBOS. Permitting us to trigger any workflow on the events that happen to the email.
Let me rephrase that. When the person you sent the email to opens that email, you will get a workflow triggered inside coreBOS, when that user clicks on a link in that email, you will get a workflow triggered inside coreBOS, when that email bounces, you get a workflow trigger, ... powerful!
To activate this integration you must go to the SendGrid integration page:
index.php?action=integration&module=Utilities&_op=getconfigsendgridactivate the integration and enter your user and API Key in the Transactional section.
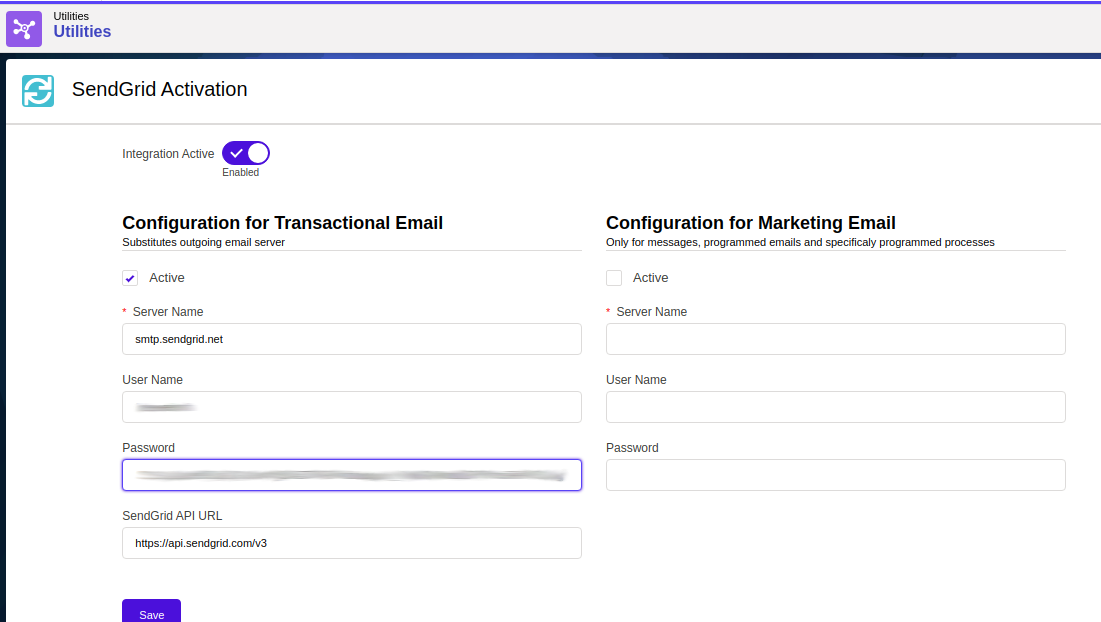
There is abundant information about how to create SendGrid API keys in their documentation. The section is in Settings > API Keys once you are logged in to SendGrid. I usually use Full Access permission.
The user name for SendGrid SMTP is always the same (apikey), this is already contemplated in the code so we don't actually use the username field in the settings.
Feedback Notifications
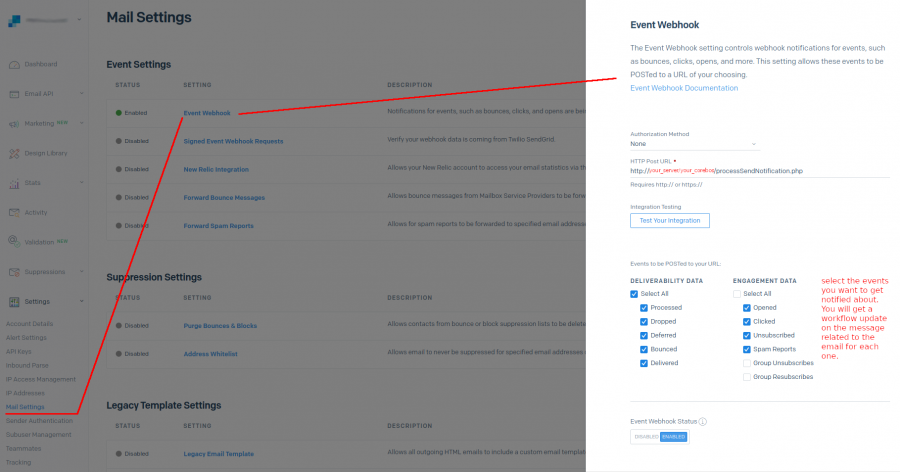
In order to get feedback on the events that happen to our emails into coreBOS we have to set up SendGrid to send us those notifications. For that we must configure the event webhook.
In SendGrid Dashboard we go to Settings > Mail Settings > Event Webhook. Put in the Post URL the URL to your coreBOS install, like this:
https://your_server/your_corebos/notifications.php?type=sendgridThen select the events we want to get notified about. For each email sent from the application, an email and message record will be created. That record will be updated, checking the event checkbox or updating a click count field and a workflow will be triggered where we will be able to add any workflow task we need.
Remember to Enable the webhook.
Authenticate with API Keys
Up to the 9th of December 2020, SendGrid accepted sending emails through their API with a combination of username and password for each account. Since this method is less secure than the usage of API Keys, from December 2020 forward, the username-password combination will no longer be valid and we must use exclusively API keys.
Creating API Keys in SendGrid is a trivial task: Settings > API keys, create and select Full Access unless you need some other permission options.
There are two ways to configure SendGrid in coreBOS, one is using it as a normal SMTP server and configure the settings in the Outgoing Email Server, the other is using the integration.
OBSOLETE: This next explanation used to work a few months ago. In march 2021 it seems that it doesn't anymore and I had to use the steps indicated after this block. I leave the block here in case you need to try this one too.
To use the Outgoing Email Server you must follow the steps indicated in the SendGrid documentation. Which says that we have to use the base64 encoded user name and API key. The user name is always the same: "apikey", and the API key value is the one you generated in SendGrid dashboard. So the settings would be
| Server Name | smtp.sendgrid.net |
| User Name | |
| Password | |
| Authenticate | TLS |
OBSOLETE: block above
To use the Outgoing Email Server you must follow the steps indicated in the SendGrid documentation. Which says that we have to use the user name "apikey" and the API key value you generated in SendGrid dashboard. So the settings would be
| Server Name | smtp.sendgrid.net |
| User Name | apikey |
| Password | your API Key |
| Authenticate | TLS |
In April 2019, coreBOS updated its SendGrid integration and only accepts API key configurations. But we had an integration based on username-password before this date which is still operative in some installs. If you are configuring SendGrid in coreBOS using the Utilities/Integrations section (see image above) you are using the API Key and will just keep working after December.
If you are configuring SendGrid using the module manager section in Settings and see a page like this:
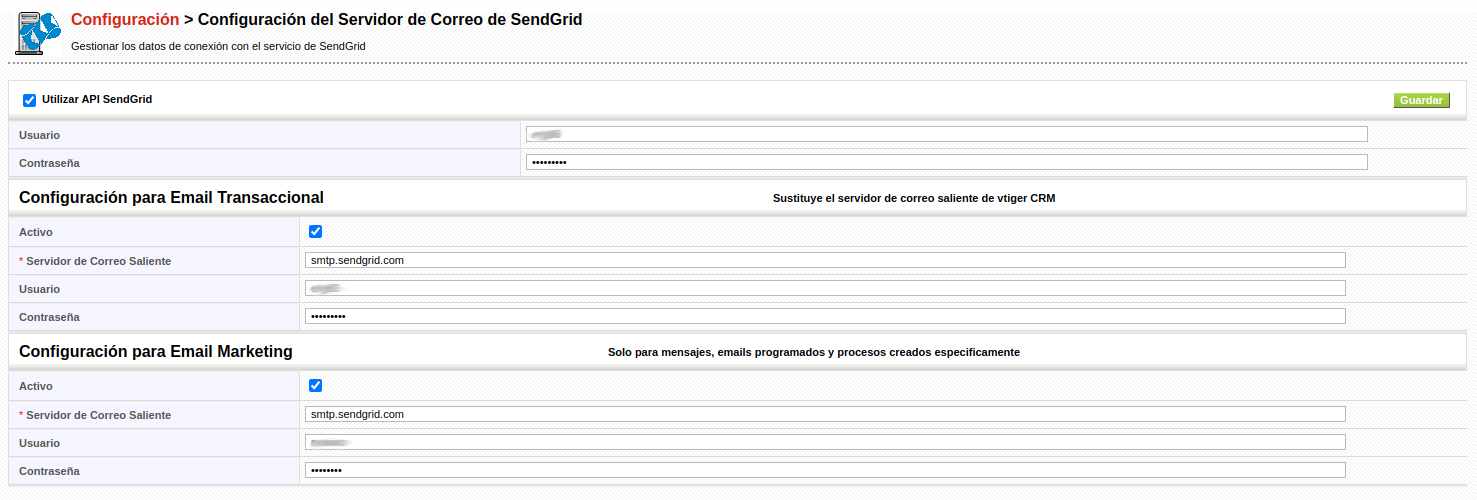
then you are using the old username-password and must make the change to API keys BEFORE December 9th 2020.
To start using API keys you must:
- access SendGrid as the user you need to activate (READ TO THE END FIRST, PLEASE)
- create an API key
- change the username to "apikey"
- change the password to the API key (no base64 encoding, set it as is, raw)
- test and verify
That should be all you need to do.
Some notes:
- As of December you will also have to set two-factor authentication on the SendGrid access. It is IMPORTANT that you activate this AFTER activating the API key change. As soon as you activate 2FA the username-password combination will STOP working. To avoid downtime and pressure activate 2FA AFTER you finished testing the API key change.
- for sub-user accounts you must treat them as if they were normal accounts. From the parent account click on the top menu and click on "Switch User". Once you have switched to the sub-user, you create an API key as you would for a normal account, and use that API key where you had the sub-user configured. Also, you may access as the sub-user and create the API key normally.
Authenticate with API Keys: Errors
Caught SENDGRID email error: 403
The from address does not match a verified Sender Identity. Mail cannot be sent until this error is resolved. Visit https://sendgrid.com/docs/for-developers/sending-email/sender-identity/ to see the Sender Identity requirements
Next | Chapter 7: Surveys