We have a special helper extension that can be found under the Tools menu called OOMerge Fields. This extension will list all available fields for each module and their internal name so we can easily copy and paste the field names into our OpenOffice template documents.
Template Grammar
-
{entity.field}
- will be substituted by the named field of the named entity, these fields can be consulted in the OOMerge Fields extension if the field cannot be found it will be left unmodified, for example, {nonexistent_entity.fieldname}, {entity.nonexistent_field}, {sihubiera} or {sinexiste}
- examples: {account.accountname}, {contact.bill_address}, {product.productcode}
-
{ifexists entity}…{/ifexists}
- all text contained inside the {ifexists} and {/ifexists} will be added to the final document if there exists at least one entity related to the main entity of the merge if none exist or the entity is not defined the whole block will be eliminated inside the block fields of the first entity found may be used
- examples: {ifexists asset}, {ifexists contact}, {ifexists campaign}, {ifexists product}, {ifexists invoice}
-
{ifexists entity.field=value}…{/ifexists}
- all text contained inside the {ifexists} and {/ifexists} will be added to the final document if there exists at least one entity related to the main entity of the merge whose indicated field has the indicated value. For fields with multiple values (multiple select picklist), the string |##| must be used to separate the values and ALL values in the field must be the same as the value for the entity to qualify as equal.
- if the entity or field does not exist the whole block will be ignored.
- inside the block fields of the first entity found may be used
- other operators are supported: > < >= <= = !=
- examples: {ifexists asset.type=Fichero}, {ifexists contact.type=Responsable Seguridad}, {ifexists campaign=GAdwords Noviembre08}
-
{ifexists entity.field in (value1,value2,value3)}…{/ifexists}
- all text contained inside the {ifexists} and {/ifexists} will be added to the final document if there exists at least one entity related to the main entity of the merge whose indicated field has at least one of the indicated values. Fields with multiple values (multiple select picklist) are directly supported, no special syntax is needed.
- if the entity or field does not exist the whole block will be ignored.
- inside the block fields of the first entity found may be used
- examples: {ifexists asset.type in (Fichero,Contacto,Aplicación)}, {ifexists Contact.tipo en (Responsable Seguridad,Responsable Ficheros)}
-
{ifnotexists entity}…{/ifnotexists}
- negative case of {ifexists…}
-
{ifnotexists entity.field=value}…{/ifnotexists}
- negative case of {ifexists…}
-
{ifnotexists entity.field in (value1,value2,value2)}…{/ifnotexists}
- negative case of {ifnotexists…}
-
{conditional entity.field==value}…{/conditional}
- all text contained inside the {conditional} and {/conditional} will be added to the final document if the condition evaluates to true. For fields with multiple values (multiple select picklist), the string |##| must be used to separate the values and ALL values in the field must be the same as the value for the entity to qualify as equal.
- other operators are supported: > < >= <= == !=
- examples: {conditional asset.type==Fichero}, {conditional contact.type==Responsable Seguridad}, {conditional campaign!=GAdwords Noviembre08}
-
{foreach entity}…{/foreach}
- for each related entity of the main merge entity, we will merge the whole text contained between the two commands and add the result to the final document
- if no related entity is found the whole block will be ignored
-
{foreach entity.field=value}…{/foreach}
- for each related entity of the main merge entity whose indicated field has the indicated value, we will merge the whole text contained between the two commands and add the result to the final document. For fields with multiple values (multiple select picklist), the string |##| must be used to separate the values and ALL values in the field must be the same as the value for the entity to qualify as equal.
- if no related entity is found the whole block will be ignored
- other operators are supported: > < >= <= = !=
-
{foreach entity.field in (value1,value2,value3)}…{/foreach}
- for each related entity of the main merge entity whose indicated field has at least one of the indicated value, we will merge the whole text contained between the two commands and add the result to the final document. Fields with multiple values (a multiple select picklist) are directly supported, no special syntax is needed.
- if no related entity is found the whole block will be ignored
-
{foreach entity.field!=value}…{/foreach}
- negative case of {foreach…}
-
{foreach entity.field !in (value1,value2,value3)}…{/foreach}
- negative case of {foreach…}
-
{foreach entity [field1 op value1 && field2 op value2 || field3 op value3]}…{/foreach}
- advanced conditions on fields with fields and operations (=,>,<,>=,<=,!=) and limited logical connectors || (or) and && (and)
-
{foreach ... *sort directive*}…{/foreach}
{foreach Timecontrol [title=MyTitle && tcunits>5] *date_start DESC*}{foreach Timecontrol *date_start DESC* [title=MyTitle && tcunits>5]}{foreach Timecontrol *date_start DESC*}- feat(Gendoc) Allow sorting in foreach loop
- Inventory Details sequence number sorting
-
{iteration}: inside the {foreach} blocks you can reference a special variable called {iteration} whose value will be that of the current loop iteration. This can be useful to enumerate the elements or to print conditional text based on the iteration. See Examples.
-
{include Document_Num}
- With this instruction, we can include any document saved in the coreBOS document module inside the main document. For example, if we have a document with reference number DOC699, we can put at the beginning of a new paragraph {include DOC699} in the position where we wish to insert the document. During the merging process, all the contents in DOC699 will be inserted in the position where the {include} directive is and the directive will be eliminated.
- You can use any other directive within the included document, following the same rules as any other document
- Nesting of {include} directives is not supported (the truth is that we haven't tried it)
- At the beginning of the page that includes the document, check the Format» Paragraph» Text Flow» Breaks, that the page number is set to 0 to keep the page counter from starting to count again.
-
{include entity}
- With this command, we can include, in the template, any document in the coreBOS document module that is associated with an entity directly related to the main entity of the merge. For example, if we have an entity Backups related to the main entity on which you compile the document, we can put
{include Backups}at the beginning of a new paragraph (in this case it would seem logical to be inside a {foreach} loop because an account probably has more than one backup) in the position where we want to insert the document. When compiling all the documents related to the Backups will be inserted in substitution of the {include} directive. - You can use any other directive within the included document, following the same rules as any other document
- Nesting of {include} directives is not supported (the truth is that we haven't tried it)
- At the beginning of the page that includes the document, check the Format» Paragraph» Text Flow» Breaks, that the page number is set to 0 to keep the page counter from starting to count again.
- With this command, we can include, in the template, any document in the coreBOS document module that is associated with an entity directly related to the main entity of the merge. For example, if we have an entity Backups related to the main entity on which you compile the document, we can put
-
{insertindex}- A table of contents will be created from the outline of the document. It can be used more than once in the same document but the TOC will be the same.
- This directive is deprecated. We do not recommend its usage. If you need an index, insert it normally and apply any styling you want. You can leave the index without any update as it will automatically be updated before converting the result to any format (PDF). In other words, you do not need to insert the index with any special directive, just add the index wherever you want as you would normally and GenDoc will recalculate it when converting to PDF. Read about it here
- It's important to mention that GenDoc will not recalculate the index when downloading the document in OpenOffice format. In this case, you will need to manually update the index as needed.
-
{image entity}
- This directive must be at the start of a paragraph.
- The paragraph with the directive will be completely eliminated
- The next paragraph must contain an image that will be the one substituted by the actual entity image
- In the case of needing various images, each image to be substituted must be different
- All the configurations made on the image will be respected, only the image will be substituted
- We treat the image directives in a special way. The idea is that there are so many possible configuration options for an image (width, height, alignment, …) that it would be complicated to include them in the image directive to indicate how the image should be rendered. So we decided that you include any image, format it as you need using the options that OpenOffice gives you for this and then we will substitute only the image leaving all the formatting as you defined it.
- In case there is more than one image field on the module you can specify which one you want using the dot notation: Contacts.myimage.
- There is a special case in the Project module to retrieve the GanttChart: Project.GanttChart
-
Rules
-
Directives must be in the same paragraph. There can not be a new paragraph in the middle of a directive. For example,
Dear {Contact.
firstname},
is incorrect.
-
The directives {ifexists}, {ifnotexists}, {foreach} and their closings must appear at the very beginning of the line in their own paragraph. The whole line will be eliminated. For example,
this is the end of the previous paragraph. {ifexists Activo.tipo=fichero} This "if exists" works correctly while this one {ifexists Activo.tipo=fichero} is ignored completely and will be passed into the final document exactly as it is. This is another paragraph that may contain labels like: {Account.accountname}. {/ifexists} -
If directives {ifexists}, {ifnotexists}, {foreach} are used at the start of a paragraph (which is mandatory) but the paragraph is inside a list, then the corresponding closings must also be added as a paragraph inside the list. This can be accomplished with the ALT-INTRO key combination. Additional text after the special directives cannot be used. For example,
{ifexists Activo.tipo=fichero} and more text here on the same paragraphis incorrect.
-
{foreach} directives can be nested.
-
{ifexists} directives can be nested with the exception of those in which a value coming from a {foreach} directive is being evaluated. For example:
{foreach Soportes} {ifexists Soportes.soporte_movil=1} XXXXXXX {/ifexists} {/foreach} -
In this case, the {ifexists} will evaluate the same entity as the {foreach} and will fail. In general, we can put {ifexists} inside a {foreach} if we are testing against a different entity, for example, this IS CORRECT:
{foreach Soportes} {ifexists Accounts.bill_provincia=Alicante} XXXXXXXXX {/ifexists} {/foreach} -
In this example, all related Soportes will be listed and if the account belongs to Alicante it will also incorporate the block XXXXXXXXXXX.
-
{conditional} directives can be nested. We can use {conditional} inside {foreach} and define one or some conditions. For example:
-
Compiling against a Potential record with a foreach CobroPago.
The following payments are higher than 500$ {foreach CobroPago} {conditional CobroPago.amount > 500} {CobroPago.parent_id} {/conditional} {/foreach} -
In this case, the Payment parent ID will be shown for each record of Payment in the related list of Potentials that has an amount higher than 500$.
-
Example 2:
{foreach CobroPago} {conditional CobroPago.paid==1} {conditional CobroPago.paymentmode in (Cash)} Potential has carried out an operation with value {CobroPago.amount} and paymentdate {CobroPago.paymentdate} {/conditional} {/conditional} {/foreach} -
In this example, we have defined 2 conditions, so if we want to use more than one condition inside foreach we can do that by adding one after the other, so if the payments have been paid and the payment mode has been Cash the information inside the conditional block will be added to the end result, if not it will be excluded from the end result.
-
Special Text Formatting in Labels
This is to allow the formatting of text that is coming from the application. This feature allows you to format the text within a label, inside the application. In other words, the format is introduced when creating the text in the appropriate field of the application, then the document generator will convert these formats directly into comprehensible elements in OpenOffice. Only 4 types of formatting items are allowed, with which it is possible to apply any OpenOffice format to the text.
<b>text</b>, OpenOffice SIGPAC_BOLD style will be applied
<i>text</i>, OpenOffice SIGPAC_ITALIC style will be applied
<style estilo=openoffice_style>text</style>, OpenOffice openoffice_style style will be applied
<br> <br/>, line break (NOT paragraph break)
This formatting will be applied to any text contained inside the directives.
Nesting of < b> and < i> is not supported, use < style> to create this effect.
The character styles SIGPAC_BOLD, SIGAC_ITALIC or any other defined by the user must be created in the template by the user, the document generator only applies the style, it does not create it, if it is not defined the text will appear normal.
There is abundant information about character styles in the online documentation of OpenOffice. Here we can see the styles definition screen:
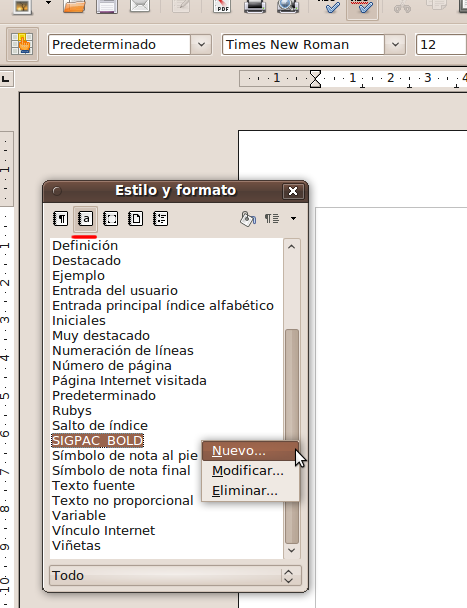
This is the template used for testing the functionality where the styles definitions can be seen.
This is an example of how the text looks inside the field of vtiger CRM.
<b>EVIDENCIA</b>: El Responsable de seguridad declara que los sistemas de información se han sometido a la precpetiva auditoría bienal en <br/><style estilo=MiEstilo>materia de protección de datos</style>
<i>DEFICIENCIA</i>: No se aprecian.
This is the finished, merged document.
Another example of character formatting.
Company Information
We can also access the company information configured in the Settings section of the application using the meta label Organization as you can see in the OOmerge Labels extension.
Since the information available in the company settings section is rather limited and you could need more, the install process created the global variable GenDoc_Company_Account where you can set the accountid of any Accounts record from which you wish to access your company's information. The idea is that you create an account record for your company and use all the fields there.
FAQ
Like this:
{date:d} of {date:F} of {date:Y}
and this would be the correct day of the week: {date:l}Next| Chapter 3: Documentation Generation::Non Supported Elements